
Worldgen (biomes, topology, cliffs and lava)
Worldgen is the step that turns your terrain into an actual Rust world. Up to this point you have a shape: hills, coastlines, mountains. Worldgen reads that finished shape and works out what every part of it is, the way Rust does: where the deserts and the snow belong, which slopes are cliffs, where forests grow, where the beaches start, and which water is ocean and which is a lake.
You get to it from the Worldgen button in the toolbar, or by pressing 9.
Here is the same map with worldgen off, and then generated. Nothing about the terrain changed. Only the world laid on top of it did:
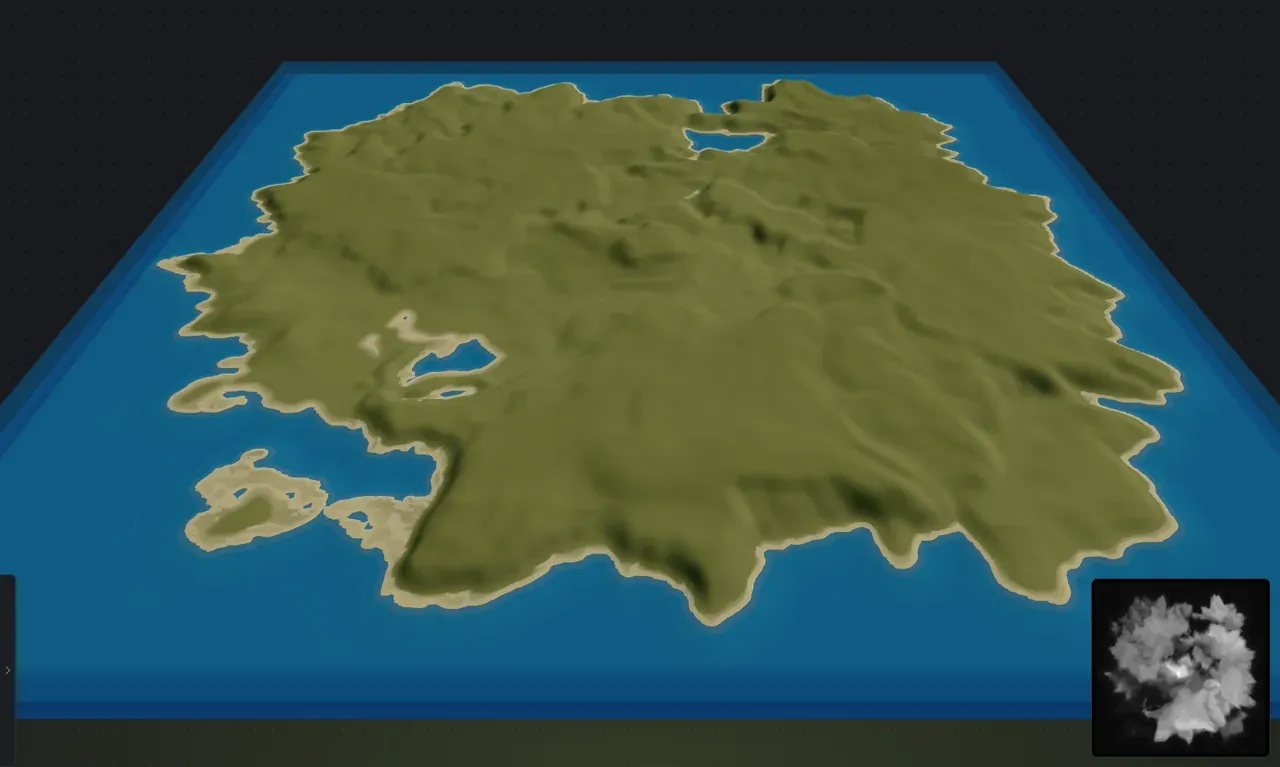
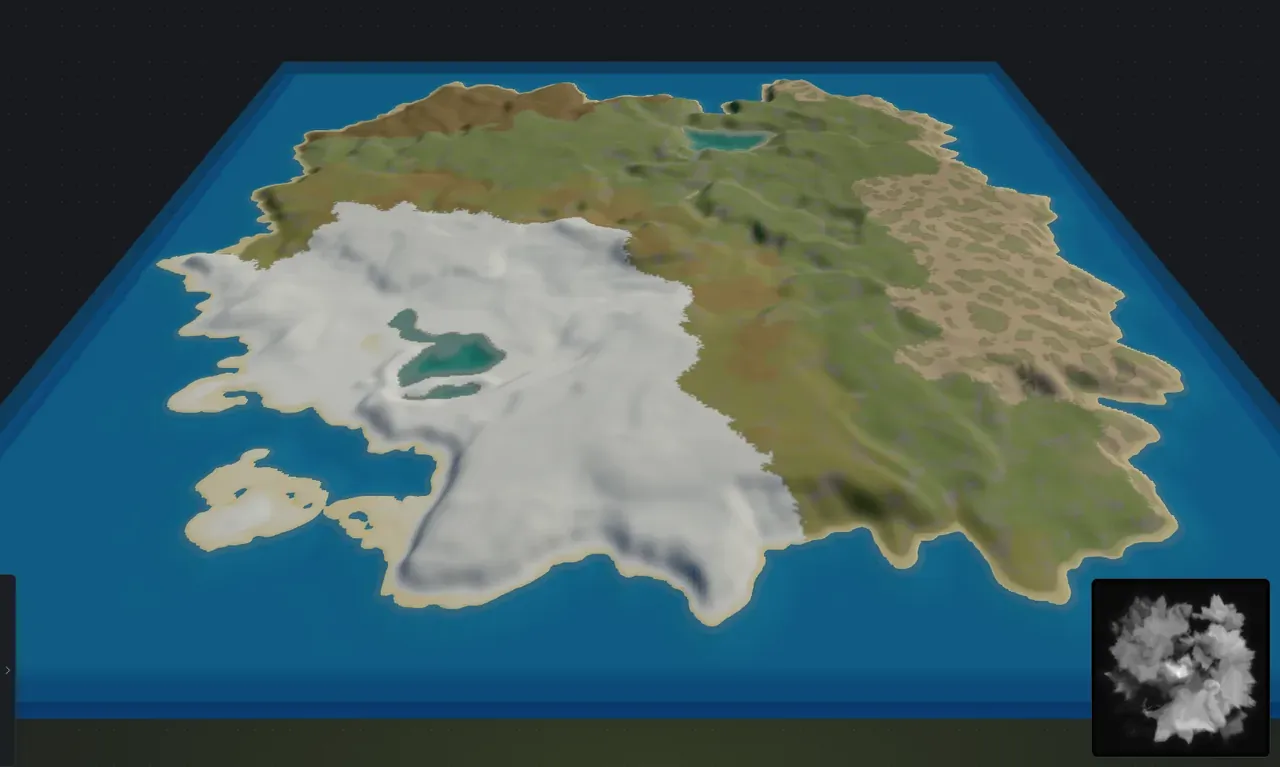
What worldgen actually generates
Section titled “What worldgen actually generates”Four layers, all derived from the terrain you already made:
- Biomes: the climate regions. Arid, Temperate, Tundra, Arctic and Jungle.
- Topology: the per-area terrain types Rust uses to decide what each patch of ground is (beach, cliff, forest, mountain, lake, and more).
- The world ground texture: a whole-map splat coat, tinted by the biome it sits in, so grass reads green in Temperate and dry in Arid.
- Lakes: land-locked water, given its own water body and its own shoreline.
Two checkboxes add more on top. Generate cliffs places Rust’s real cliff and rock models on the steep ground, and Generate lava fills a volcano’s vent with real, damaging lava.
All of it rides into the .map file you export, so RustEdit opens a finished world rather than a bare heightmap.
Generating the world
Section titled “Generating the world”Open the panel and click Generate full map. The button becomes Regenerate map once a world exists, and the status line next to it reads Not generated, Deriving… or Generated, along with how many islands the map has.
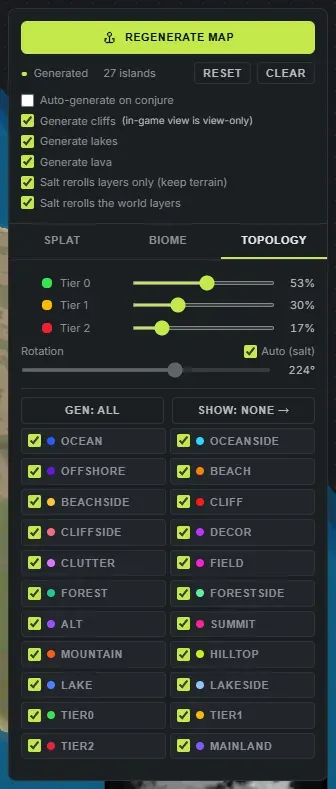
The panel is non-modal, so the map stays live while it is open. You can generate, look, tweak a slider, and look again without closing anything. Press 9 again or Escape to close it.
Two more buttons sit on that row:
- Reset puts every worldgen value back to its default.
- Clear throws the generated world away and returns the map to bare terrain. It only becomes available once a world exists.
Everything in this panel rides undo and redo. Drag a biome share or the rotation, decide you preferred it before, and Ctrl+Z puts the control and the world it produced back. A slider drag is one undo step, not one per pixel.
Auto-generate on conjure
Section titled “Auto-generate on conjure”Off by default. A conjure gives you terrain only, and you generate the world when the shape is finished. That is deliberate: worldgen is derived from the terrain, so there is little point deriving it against a shape you are still changing.
Tick Auto-generate on conjure and every new map arrives with its world already built.
Once a map is generated, Crucible keeps the world in step with your edits on its own. Move an island and drop it, release a slider, and the layers re-derive against the new shape. You do not have to press Regenerate after every change.
Salt and the world
Section titled “Salt and the world”The Salt reroll (H) is how you roll a different world without touching your terrain.
- Salt rerolls layers only (keep terrain) is on by default, so a salt reroll leaves your shape exactly as it is and only re-rolls the world on top.
- Salt rerolls the world layers decides whether the next reroll moves the biomes, tiers, splat and topology. It is on by default. Turning it off freezes them exactly as they are on screen and leaves salt rerolling the terrain alone; turning it back on leaves them where they are and lets the next reroll move them again. The checkbox never changes the map on its own.
This is the fastest way to audition worlds. Get the landmass you want, then hit H until the climate falls where you like it.
Biomes
Section titled “Biomes”The biome tab sets the climate regions. Tick Show biome overlay on the terrain to paint them onto the map so you can see exactly where each one lands:
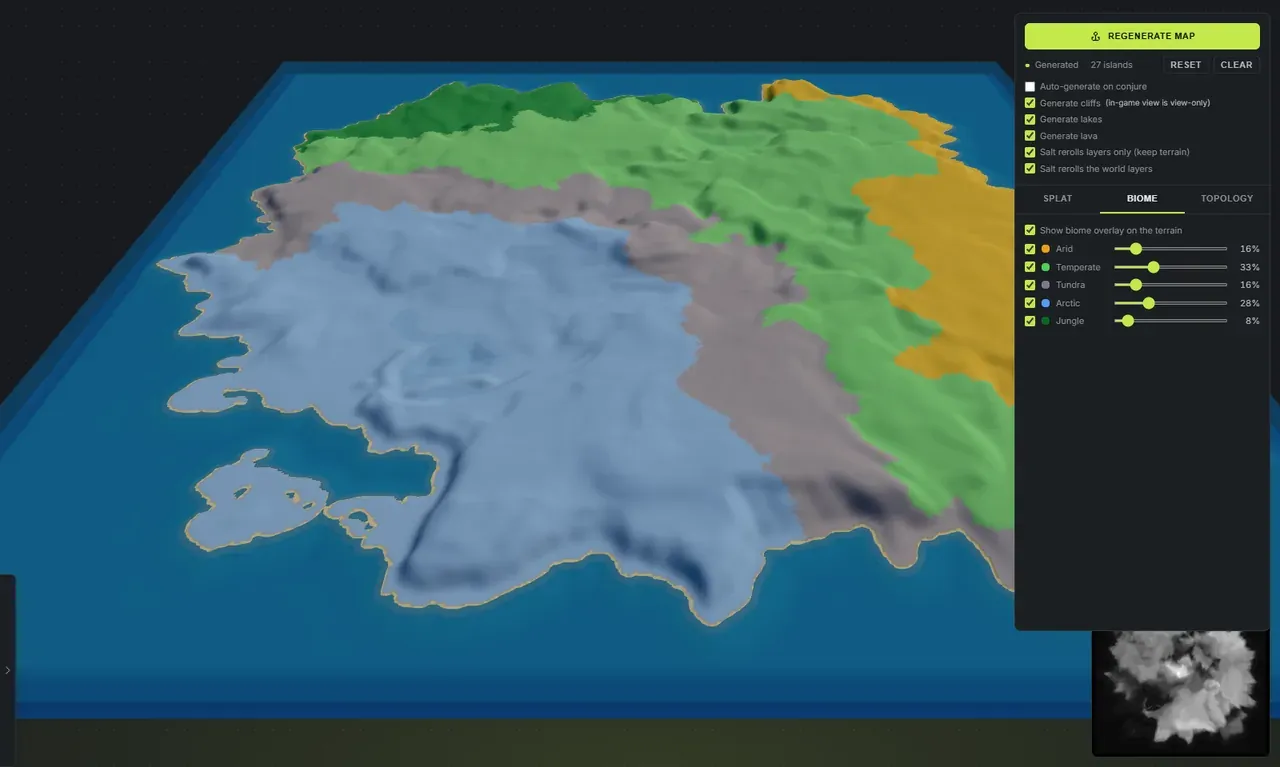
The five Rust biomes:
- Arid: hot, dry desert. Sandy and sparse.
- Temperate: the classic green Rust look, and the biome everything else borders against.
- Tundra: the cold, muted band that sits between temperate land and the arctic.
- Arctic: snow. This is what gives ground, trees and rocks their snowed-over look.
- Jungle: dense, humid, heavily forested.
Each row has a checkbox (allow this biome at all), a colour swatch, and a share slider with a live percentage.
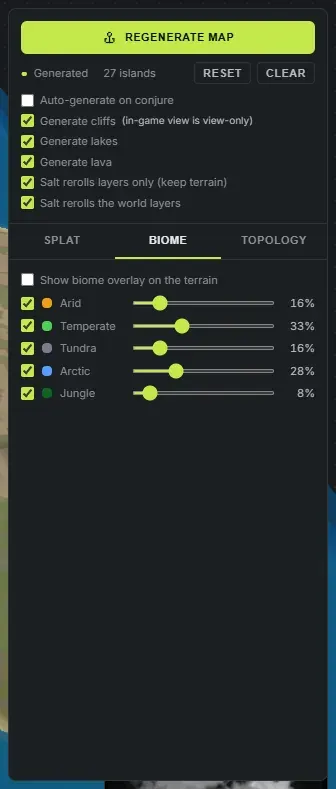
The thing worth understanding: until you touch a slider, the sliders mirror what the salt rolled, so they move on every reroll and show you the mix you actually got. The moment you grab one, that becomes a target you have set, and Crucible holds the percentages there.
Dragging a share updates the map live, while you drag, with the biome overlay switched on for you. And a share you set is a target, not a redraw: growing Arctic pushes the arctic region outward from where it already is, and shrinking a biome pulls it back toward its own shoreline, so the layout evolves instead of jumping to a new one.
Your hand-set shares are temporary by design. A new conjure or a salt reroll hands the sliders back to the roll, so you never end up with a fresh map wearing an old map’s percentages. Reset does the same on demand.
How biomes get placed
Section titled “How biomes get placed”Each biome is grown from a single anchor point, and the anchors are chosen together so that biomes sit away from each other rather than colliding. From there they grow outward at once, competing for ground, each stopping when it reaches its share.
Three things follow from that, and they are what the regions look like:
- Every biome comes out as one connected body, not scattered chunks across the map.
- Borders finger and interlock. Two biomes meet along a ragged, varying seam that follows the ground, never a clean arc, and the detail changes along its length instead of running the same texture end to end.
- Tundra is a real transition. It separates the arctic from the temperate along the arctic’s whole land border, wide enough to read as its own band rather than a stripe.
Placement also follows the terrain, so an arctic region settles on the cold end of the map, a desert lands on the dry flank, and jungle reaches its own coast instead of floating inland. A long thin strip of biome that never amounts to anything gets handed back to its neighbour rather than left as a ribbon, so if a sliver you half-noticed disappears between rolls, that is why.
For what each biome actually means in game, which animals and plants spawn in it and what the ground has to be for them to spawn at all, see Rust biomes and topology.
If you want to overrule the result anywhere, use the biome brush.
Topology
Section titled “Topology”Topology is Rust’s per-area terrain-type layer. It tags every part of the map as beach, cliff, forest, mountain, lake and so on, and Rust reads those tags to decide how each patch of ground behaves: where a shoreline is, which slopes get decorated as real cliffs, where forests and ore nodes belong, and how spawns and monuments treat the ground.
Unlike a ground texture, a single spot can carry several topology tags at once, so topology is a set of on/off layers rather than one colour.
Rust defines 31 topology tags in total. Crucible generates the 22 that a custom map needs, and the topology tab lists them:
Ocean · Oceanside · Offshore · Beach · Beachside · Cliff · Cliffside · Decor · Clutter · Field · Forest · Forestside · Alt · Summit · Mountain · Hilltop · Lake · Lakeside · Tier0 · Tier1 · Tier2 · Mainland
Every row is two controls, and this catches people out:
- The row itself toggles that layer’s overlay on the map, so you can see where it sits. The tooltip reads “Click to show this layer”.
- The checkbox inside the row decides whether that layer gets generated at all. The tooltip reads “Generate this topology layer”.
So clicking the word Cliff shows you the cliffs. Clicking the box next to it stops them being generated. Two buttons at the top of the list do the same thing in bulk: Gen: flips every layer’s generate box, Show: flips every overlay. Each one reads its current state, so it says all when everything is on and none when it is not.
Leave the generate boxes alone unless you have a specific reason. The defaults produce a correct Rust world.
Tier 0, Tier 1 and Tier 2 are Rust’s difficulty bands, and they drive what spawns where. They default to 30% Tier 0, 45% Tier 1, 25% Tier 2.
The three sliders are constant-sum: drag one and the other two rescale so they always total 100%. Dragging a tier shows the tier overlays and re-derives live, so you can watch the bands move as you set them.
The three tier rows in the topology list show and hide as one. Clicking Tier 0, Tier 1 or Tier 2 turns all three overlays on or off together, because the bands only make sense read against each other.
Rotation turns the whole biome and tier layout across the map. Auto (salt) is ticked by default, so every conjure and every salt reroll picks a fresh angle; the readout still shows you the angle in use. Untick it to freeze the layout at exactly that angle and drag it yourself. Like the biome shares, a rotation you set by hand goes back to Auto on the next conjure or salt reroll.
The world ground texture
Section titled “The world ground texture”The splat tab has a single option: Generate the world splat layer, on by default.
With it on, generating classifies a ground texture across the whole map from the settled terrain: seabed sand, shorelines, rock on the cliffs, snow caps, forest stands and grass, all tinted by the biome underneath. This is what makes the generated map look like a Rust map rather than a green blob.
Turn it off and the map keeps its simpler per-island base surface, while biomes and topology still derive normally.
This world texture is separate from anything you paint by hand with the splat brush. When you export, your hand painting is merged over the top of it, so you get the generated world with your own work laid on it.
Any land-locked body of water big enough to count becomes a lake: it gets the Lake topology, its own shoreline ring, a gravel and stone bed, and a real Rust water body so it renders as an actual lake in game rather than a hole full of sea.
Lakes get their own colour in the in-game view so you can pick them out at a glance, and lake shores grow their own forest edges. Some large lakes are ringed with cliff shores and some are not, by design. A lake big enough can also grow its own islands, which are real islands you can select and edit like any other.
Generate lakes, next to Generate cliffs, is the switch. It is on by default. Turn it off and every lake is handed back to the ocean: its Lake and Lakeside layers become Ocean and Oceanside, and no water body is placed. A basin below sea level then fills with sea instead of sitting empty, and a pond perched above sea level goes dry. Turn it back on and the lakes come back exactly as they were. The terrain, the shoreline and the lake bed never move either way, only the water class.
Like cliffs, this decides what you preview, not what ships: the export chooses for itself. See export a Rust .map file.
Full detail on all of it: lakes on a custom Rust map.
Generate lava is the third checkbox in that row, and it is on by default. A volcano carries real lava in its vent, and it is the damaging Rust prefab rather than a texture, so anything standing in it takes damage. A crater and a caldera have none: a crater is a dry dent, and a caldera’s middle is water or, on about one roll in four, open ground.
Turn it off and the lava disappears from both views. Like cliffs and lakes it decides what you preview, not what ships, and it costs nothing either way because the lava is measured off the finished terrain rather than derived with the layers. See export a Rust .map file for which outputs carry it.
Cliffs
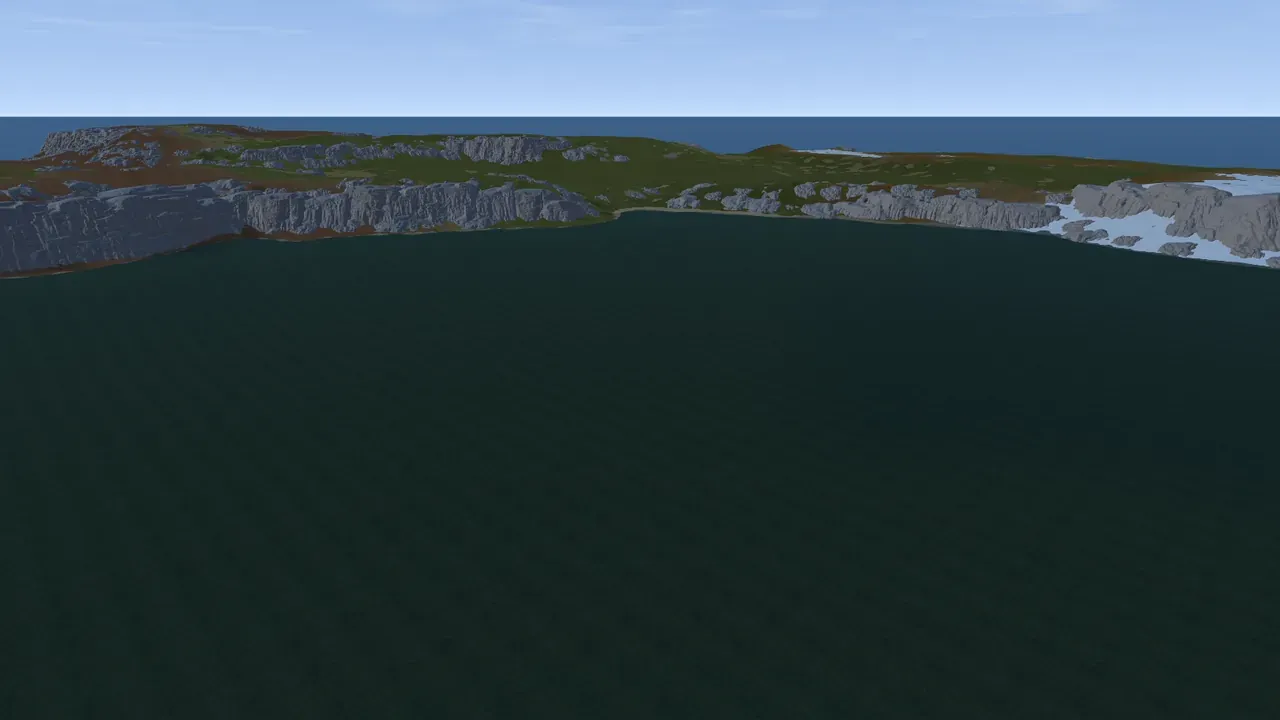
Section titled “Cliffs”Generate cliffs places Rust’s real cliff and rock models on the steep ground: tall cliff walls on the sheer faces, hill cliffs and scattered rock on the softer slopes. They are baked into your .map, so they are there when the map opens in RustEdit and when players load in.
It is off by default, because standing up thousands of real models is heavy.
With cliffs on, part of the in-game view locks. Anything that reshapes the ground under a standing cliff is blocked there: the terrain brush, the biome and topology brushes, dragging islands, and the grid. Conjure, salt and randomize all still work, and so does splat painting, camera, sun and the slope overlay. Switch to the 3D view for the locked tools.
You do not have to turn this on to ship cliffs. The All layers .map export generates them at export time either way, so you can keep the viewer light and still export a cliffed map. Full detail: Rust cliffs and rocks on a custom map, and export a Rust .map file.
What ends up in the .map
Section titled “What ends up in the .map”Everything on this page. When you export a .map with All layers (the default output), the file carries your terrain, the biomes, all the topology layers, the world ground texture, the lakes as real water bodies, a volcano’s lava, and the cliff and rock models. RustEdit opens it as a finished world.
A map you never generated still exports correctly. It simply ships as fully Temperate, with terrain and ground textures and no derived world.
- Get the terrain finished first, then generate. Worldgen reads the shape, so it is the last step, not the first.
- Use H (salt) to audition climates without losing the landmass you like.
- Turn the biome overlay on while you set shares. The percentages are much easier to judge when you can see where they land.
- Leave Generate cliffs off while you are shaping, and turn it on when you want to look at the finished thing.
- Turning Generate lakes off is a quick way to see what the map looks like as pure coastline, and it costs nothing to turn back on.
- Reach for the biome and topology brushes only where the generated result is not what you want. The derive gets most maps right on its own.