
Create your first Rust server
With Crucible Local Server installed and the Rust dedicated server files on disk, a working server is a few clicks away. The app keeps a list of server configs and runs one at a time by default, so each entry is a saved setup you can return to.
Create a new server
Section titled “Create a new server”Open the new server flow from the empty state or the + button on the server rail, then pick a preset to fill in sensible defaults:
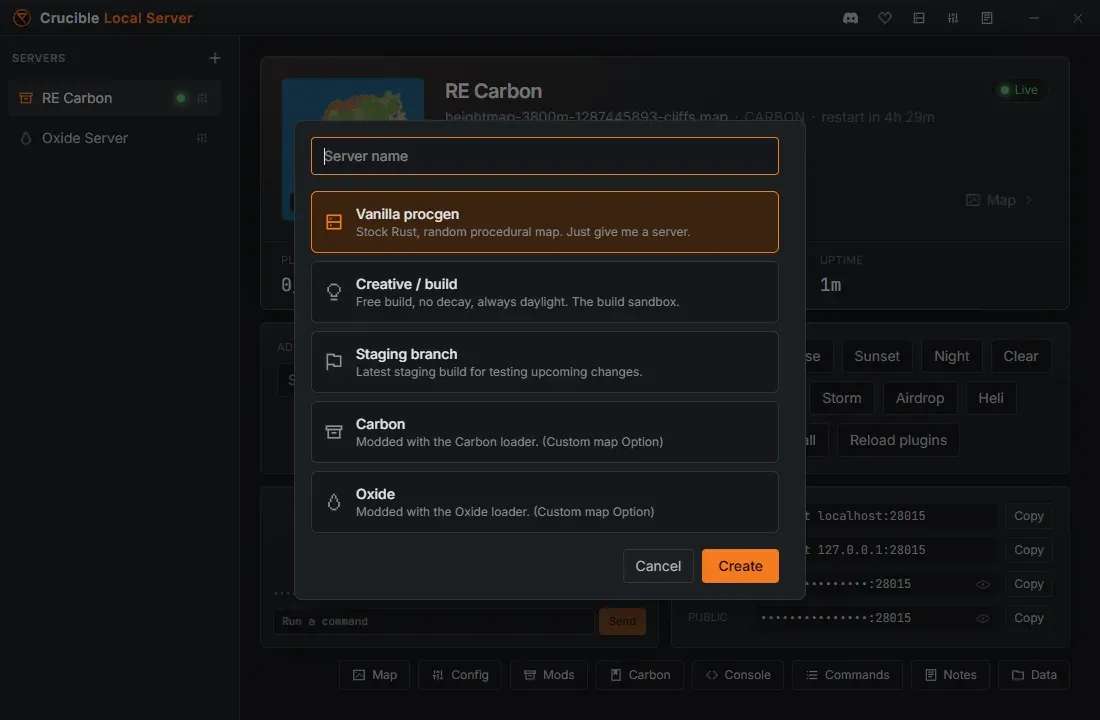
- Vanilla procgen: a standard procedurally generated survival server, the default stack.
- Creative / build: tuned for building and testing, with the creative and build rules seeded on, locked daylight and clear weather, and disruptive events off.
- Staging branch: runs against Rust’s staging build for testing upcoming changes. A second step asks which staging build to run: staging main (vanilla, Carbon or Oxide), or one of the aux dev branches. To join one, switch your Rust client to the same branch.
- Carbon: a server on the Carbon mod stack, ready for plugins.
- Oxide: a server on the Oxide mod stack, ready for plugins.
The mod stack (Vanilla, Carbon, or Oxide) and the branch are set here and fixed for the server’s life, because changing either one after the fact points the server at different game files and regenerates its world. Create a second server instead: they are cheap, and each keeps its own world.
Everything else is editable once the server exists, including assigning a custom map from the Map tab, and you can give each server its own name and icon.
The Quick view and the detail tabs
Section titled “The Quick view and the detail tabs”Each server opens to a Quick view: a top-down map preview, big Start and Stop buttons, Restart and Join, live stats, one-click quick actions for time, weather and events, an admin card, a console peek, and copyable connection strings. That is enough to get a server running and play on it.
Everything deeper sits behind the row of buttons along the bottom of the Quick view. Each one opens that tab directly:
- Map: the maps library, custom-map delivery, and your saved worlds. See run a custom map on your server.
- Config: the server settings, live server rules, the restart schedule, and a real
server.cfgeditor. See server settings and server.cfg. - Mods: plugin management for a Carbon or Oxide server. This tab appears only on modded servers. See install mods and plugins.
- Console: the live server console with RCON. See console, RCON, and admin tools.
- Commands: a searchable reference of hundreds of admin, creative and cinematic commands plus every server variable. See commands and server vars.
- Notes: a markdown notebook for this server. See notes for every server.
- Data: wipes, backups, and the confined file browser. See wipe, back up, and reuse a world.
When a server runs Carbon or Oxide, a matching guide tab also appears, labelled Carbon or Oxide, with plugin and permission commands and where the files live. A vanilla server shows neither it nor the Mods tab.
Once you are in a tab, a full tab strip runs across the top, so you can move between tabs without going back. The Simple link at the top left returns you to the Quick view. Nothing is removed either way: the Quick view is the shortcut, the tabs are the depth.
Manage the servers in the list
Section titled “Manage the servers in the list”Servers build up fast, so the rail on the left is yours to organise. Drag a server up or down to reorder the list, and it stays where you put it.
Each row has a More button on its right, drawn as a small sliders glyph (three horizontal lines with knobs on them). Click it for:
- Rename: give the server a clearer name. Double-clicking the row does the same thing.
- Change icon: pick an icon so you can tell your servers apart at a glance.
- Duplicate: copy a whole server setup, handy when you want the same config on a second world.
- Delete: remove the server.
Deleting a server
Section titled “Deleting a server”Deleting a server deletes its world. The confirmation carries a Keep a final backup of the world first checkbox, so you can take one last copy on the way out. Tick it if there is any chance you want that world back, and the backup lands with your others in the Data tab. See wipe, back up, and reuse a world.
A running server refuses to be deleted. Instead of opening the confirmation, Delete shows “Stop name before deleting it.” Stop it first, then delete.
Your notes are never deleted with a server. They are kept aside, and a server that comes back reclaims them.
Start, wait for Live, and join
Section titled “Start, wait for Live, and join”- Press Start to spawn the Rust dedicated server. The console streams live and web-RCON connects on its own. If the Rust files are not installed yet, the app installs them first.
- Watch the status. A server goes Stopped, then Starting, then Live. RCON connects seconds before the world is ready, so the app waits for the real “server startup complete” point and only shows Live when the world is actually joinable.
- Once it is Live, press Join to connect through Steam and walk your server in first person. Restart announces a countdown, then gracefully stops and starts.
- Press Stop for a graceful shutdown. The status reads Quitting while Rust saves the world and shuts down, then Stopped. That pause is the save, so let it finish rather than killing the app.
- One server runs at a time by default, so the app blocks starting a second one or binding a port that is already in use. You can unlock running several at once in Settings.
Next steps
Section titled “Next steps”- Run a custom map on your server, including the Heightmap handoff.
- Install mods and plugins with Carbon or Oxide.
- Set up console, RCON, and admin tools.
- Configure the server and its server.cfg.
- Restart it automatically on a daily schedule.